Working with multiple cloud applications often requires handling authentication tokens to connect your applications seamlessly and securely. With Invantive Cloud, generating refresh and access OAuth-tokens for various platforms—such as Confluence, JIRA, Fortnox, Exact Online, Teamleader, GitHub, and PayPal—has never been easier. Invantive Cloud’s Pre-authenticate module provides an intuitive and free way to generate and retrieve access and refresh tokens that grant access to these services. This article will guide you step-by-step through this streamlined process.
The Pre-authenticate module is ideal to to set up a test environment to quickly access data contained in a cloud application, protected by OAuth.
As a unique feature, the Pre-authenticate module does NOT require you to first set up a website to retrieve the authorization code. The two phase approach with copying & pasting the authorization code enables you to generate access and refresh tokens for almost any redirect URL.
Step 1: Accessing the Pre-authenticate Module
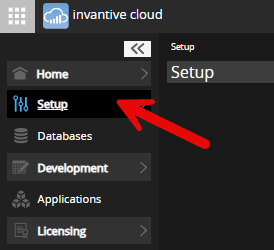
Navigate to the Invantive Cloud platform on https://cloud.invantive.com and sign up for a free account using this hyperlink. From the main screen:
- click on Setup:

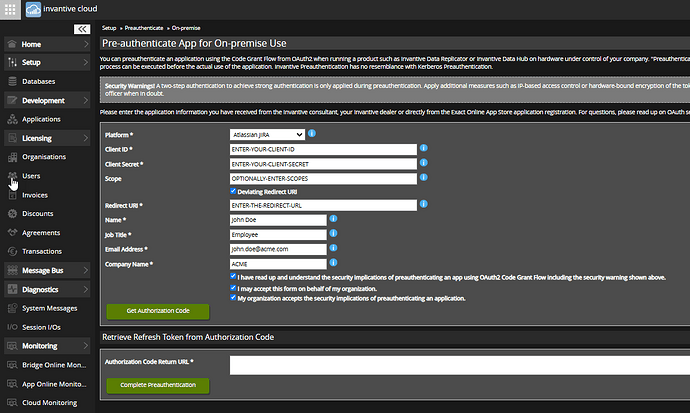
- select Pre-authenticate:

- select For On-premise Use:

This module is accessible to all users and offers a straightforward interface that makes generating access and refresh tokens accessible, even if you’re not a developer.
Step 2: Choosing the Platform
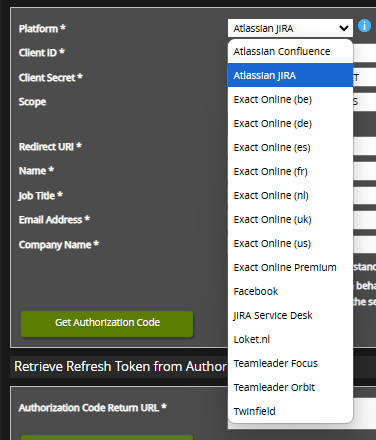
Once in the Pre-authenticate module, begin by selecting the platform you want to connect. Invantive Cloud supports a broad range of platforms including Confluence, JIRA, JIRA Service Desk, Fortnox, Exact Online, Facebook, Teamleader Focus, Teamleader Orbit, Calendly, GitHub, GitLab, Loket, and PayPal. Each of these platforms requires unique access tokens for initial secure access and refresh tokens to generate more access tokens, and Pre-authenticate configures these for you with minimal hassle.

Step 3: Inputting Client ID and Client Secret
After selecting your platform, the next step is to enter the Client ID and Client Secret associated with your account on that platform. These credentials authenticate your requests to the platform’s API. You can usually find the Client ID and Client Secret in your platform’s developer settings, typically under “API Access” or “Developer Tools.”
Step 4: Specifying Scopes (If Required)
Certain platforms allow you to specify scopes that define the type of data access granted to Invantive Cloud. Scopes offer flexibility in defining permissions; for instance, on GitHub, you might specify read-only access, while on Exact Online, you might allow both reading and writing permissions for accounting. Leave empty if you’re unsure which scopes to include; the defaults are typically fine for use.
Step 5: Entering Your Username and Password
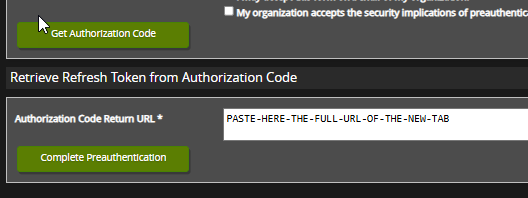
For the final step, click “Get Authorization Code”.
The browser opens a new tab and navigates to the link application. Input your username and password for the selected platform. This information allows Invantive Cloud to generate a so-called “Authorization Code”.
Step 6: Get Access and Refresh Token
The resulting URL can be pasted into the box next to “Authorization Code Return URL”:

Understanding the Benefits
The Invantive Cloud Pre-authenticate module is not just another authentication tool—it’s a user-friendly, free solution that simplifies token management across multiple platforms. You don’t have to manually handle tokens, reauthenticate for every session, or worry about token expiry. Invantive Cloud does the heavy lifting, allowing you to focus on the data retrieval.
