DISCLAIMER: Bridge for Power BI & Power BI Connectors are depricated
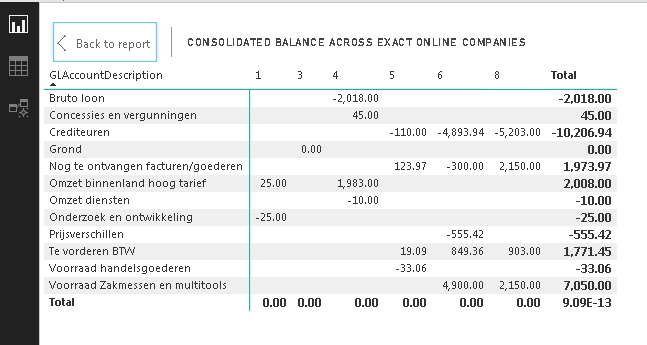
Learn how to create your first Power BI report with Invantive Bridge and Exact Online. Your first Power BI report will consolidate balances across multiple Exact Online companies and resembles:
Invantive Bridge for Power BI is an ado.net-based driver which allows access to over 70 platforms. For large volumes of data (over 5 Exact Online companies or companies with many transactions) we recommend Invantive Data Replicator (replicated with a delay, while allowing access from Tableau, Qlik etc also) or Invantive Data Access Point (real-time).
Note that there is also a much easier to configure online variant named Invantive Bridge Online as part of Invantive Cloud.
Please remember that Power BI is ongoing development and that each month a new release is made available which improves but also sometimes breaks use.
Instructions
The steps consists of a number of groups:
- Installation and connector configuration.
- Authentication using either TOTP-secret or refresh token supplied as connection string or from an existing database definition in the settings*.xml format.
- Actual Use.
Installation and Connector Configuration
Execute the following steps:
- Download and install the desktop edition of Power BI. This is a device-wide installation which requires administrative privileges.
- Download and install Invantive Bridge itself. This is a device-wide installation which requires administrative privileges.
- Download and install the Connectors for Power BI of Invantive Bridge. This is a per-user installation.
- Start Microsoft Power BI from the Start menu.
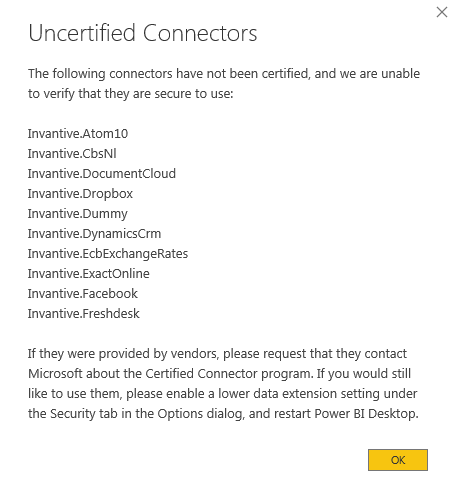
- Currently (Q1 2019), Microsoft does not seem to accept certifications on custom connectors, so we will have to go through a few additional steps.
- Acknowledge five times the following error till Microsoft finishes of the certification (note that each time the list of Uncertified Connectors is different, but that all start with Invantive):
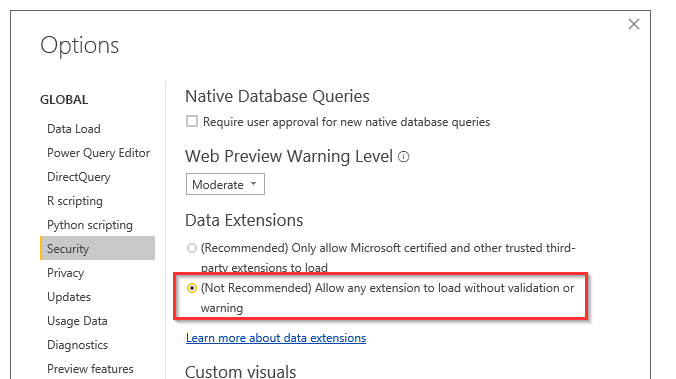
- Go to the Options dialog and select the “Security” tab:
- Configure Data Extensions as follows:
- Select the “OK” button.
- Restart Power BI.
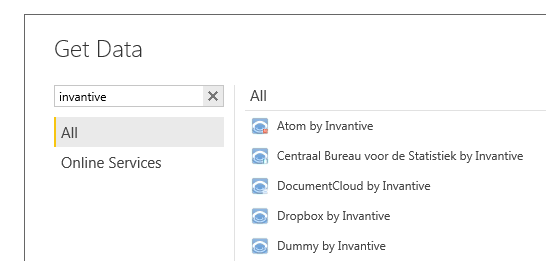
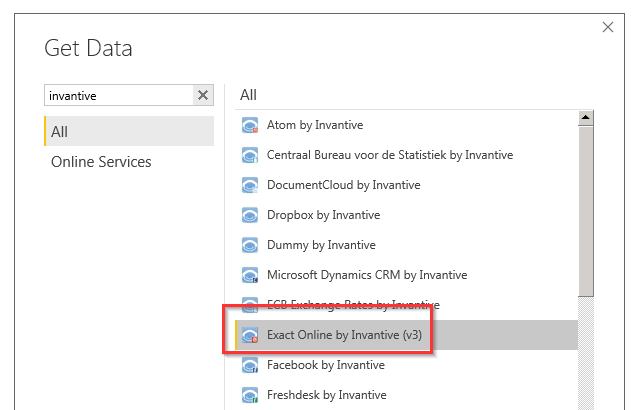
- Choose “Get Data” from the start window or from the Home ribbon:
- Enter the prefix “Invantive” in the search filter:
- Select “Exact Online by Invantive (v3)”:
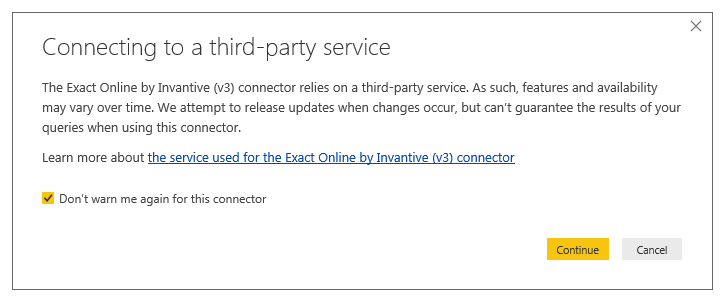
- Select the “Connect” button.
- After a delay, a warning is displayed: Check the box and select “Continue”:


Authentication
Invantive products offer various approaches to authentication on Exact Online:
- the so-called “Code Grant Flow”, using a refresh token which contains user and an application-specific password. This approach is available with Invantive Bridge for Power BI.
- the so-called “Implicit Grant Flow”, using an interactive user/password log on, followed by the need to enter a verification code every ten minutes. This approach is not available with Invantive Bridge for Power BI.
- a headless variant of the Implicit Grant Flow, which allows you to enter user name, password and the TOTP-Secret which generates the verification code on the fly.
For initial tests, we recommend using the TOTP-Secret since it is easier to use. However, the headless variant is not official supported by Exact Online and less secure, so for production or recurring use, we recommend using a refresh token with the Code Grant Flow.
Authentication using TOTP-Secret
This authentication approach using your user name, password and the TOTP-secret used to generate the 6-digit verification code on log on. You probably have noted down somewhere the user name and password you use upon log in to Exact Online. The TOTP-secret is harder to determine.
Get TOTP Secret Using Invantive Authenticator
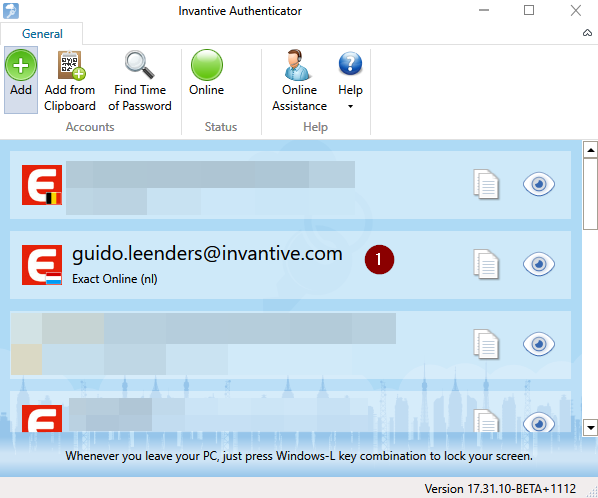
When you are already using Invantive Authenticator to generate the verification code, it is quite simple:
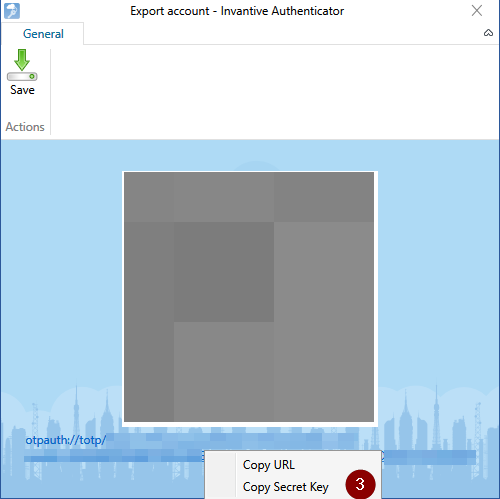
- Click on the account:
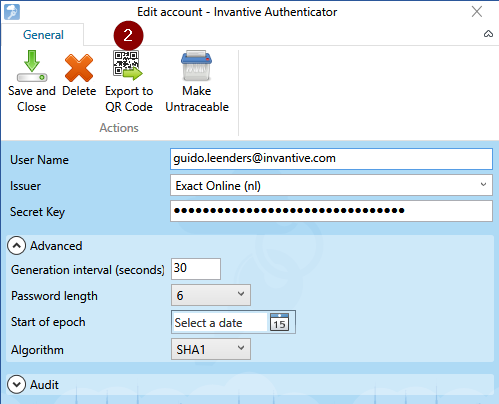
- Click on “Export to QR Code“:
- Right-click on the hyperlink and select “Copy Secret Key“:
- Safe this secret key in a secure location.
Get TOTP Secret Without Invantive Authenticator
When you are not using Invantive Authenticator, you can generate a new TOTP-secret by following these instructions.
Generating a new TOTP-secret on Exact Online invalidates by design all previous TOTP-secrets. Remember to upload the new TOTP-secret using the text or QR code to your phone app, Invantive Authenticator or whatever application you use.
Using the TOTP-Secret
Execute the following steps to finish authentication using TOTP-secret:
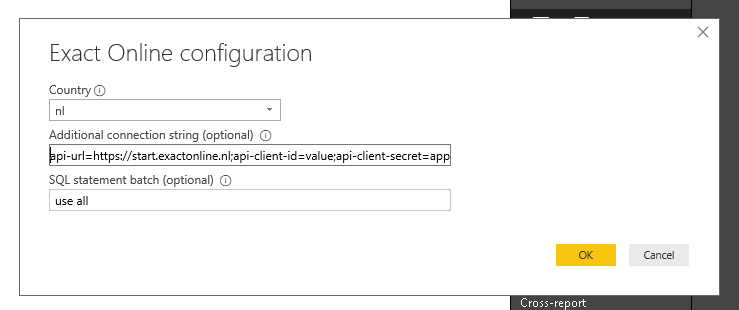
- The TOTP-secret can be applied to the data source in the Exact Online configuration window which appears after selecting the connector:
- First select the country.
- As shown, the TOTP secret should be specified as:

totp-secret=SECRET-VALUE
- By default, the connector uses the Exact Online company last used in the web interface. However, with a statement such as “use all” you can select all available Exact Online companies. You can also select a limited list of Exact Online companies by specifying a list of so-called division codes (typically 6 or 7 digits long) such as “use 102673,1456234”.
- Select the “OK” button.
- The next window allows you to enter the log on code and password of Exact Online:
- Specify these and select “Connect”.
- You have now completed the setup. Take a rest or start enjoying your data as described in the section “Actual Use”.

Authentication using Refresh Token
Generate a Refresh Token
You can generate a refresh token using Invantive Cloud following the pre-authentication procedure.
In the last step, you will be provided with a value for your connection string in the field labeled “Content settings.xml“ looking similar to:
api-url=https://start.exactonline.nl;api-client-id=value;api-client-secret=app-password;api-redirect-url=https://exactonlineclientredirect.invantive.com;api-refresh-token=something-secret
When your authentication fails after ten minutes, please contact Invantive Support, provide your client ID and request disabling of obsoleting old refresh tokens. This typically takes one working day.
Use the Refresh Token
Execute the following steps to finish authentication using the refresh token:
- The refresh token can be applied to the data source in the Exact Online configuration window which appears after selecting the connector:
- First select the country.
- As shown, the connection string (including refresh token) should be specified as:
api-url=https://start.exactonline.nl;api-client-id=value;api-client-secret=app-password;api-redirect-url=https://exactonlineclientredirect.invantive.com;api-refresh-token=something-secret
- By default, the connector uses the Exact Online company last used in the web interface. However, with a statement such as “use all” you can select all available Exact Online companies. You can also select a limited list of Exact Online companies by specifying a list of so-called division codes (typically 6 or 7 digits long) such as “use 102673,1456234”.
- Select the “OK” button.
- The next window allows you to enter the log on code and password of Exact Online:
- Leave all empty and select “Connect”.
- You have now completed the setup. Take a rest or start enjoying your data as described in the section “Actual Use”.
Actual Use
After authentication,we create a small report on balances.
Since Invantive is the only party providing access to all over 800 APIs on Exact Online, the number of choices can be overwhelming. The APIs are grouped in Power BI to make them easier to navigate. Please refer to the Exact Online Entity Relation Diagram or the online searchable data model documentation of Exact Online for details.
Execute the following steps:
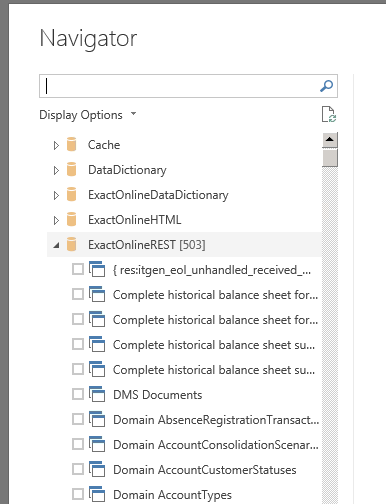
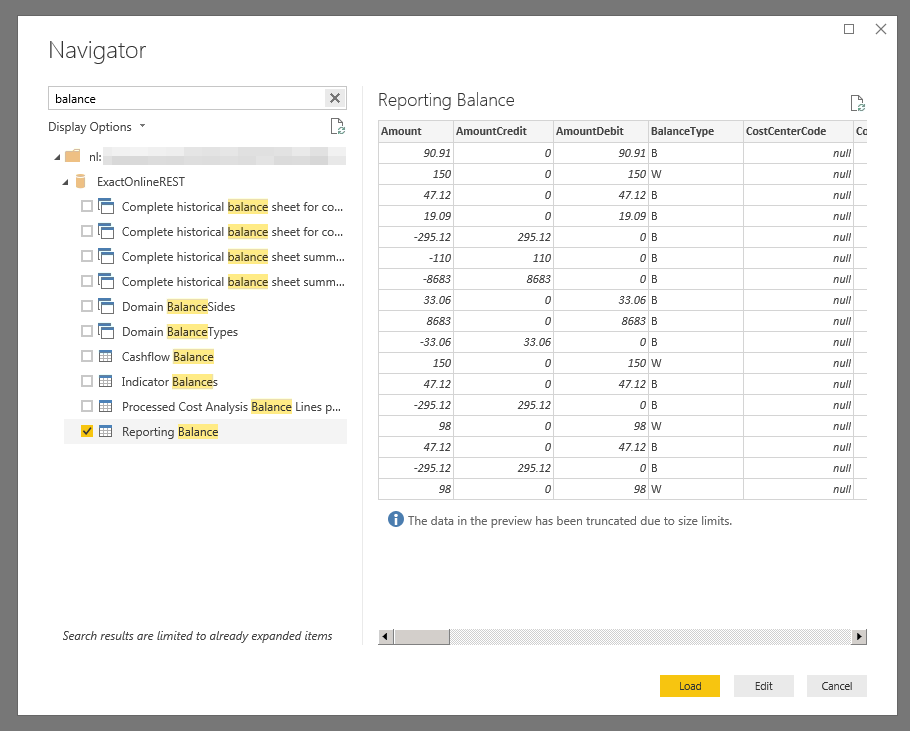
- In the navigator please open the group “ExactOnlineREST”:
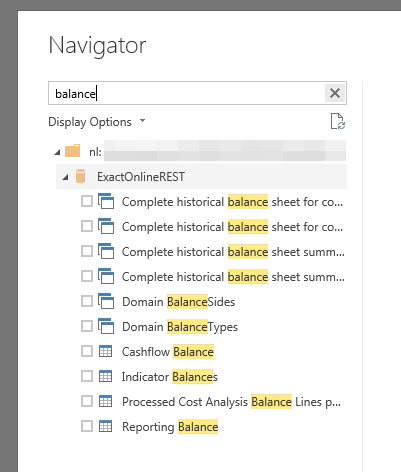
- In the Search box, enter “Balance”:
- Remember that the search box will only search in previously opened groups, which you can recognize by the number of tables contained (503 tables for ExactOnlineREST above).
- Check the box on Reporting Balance and wait for the preview to appear:
- Select the “Load” button.
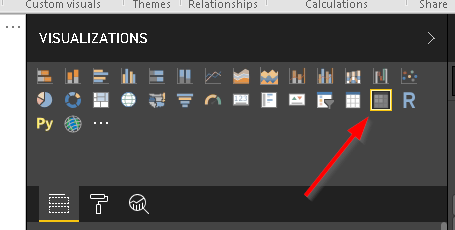
- The data is loaded into Power BI.
- Click directly under Visualizations on the Matrix symbol:
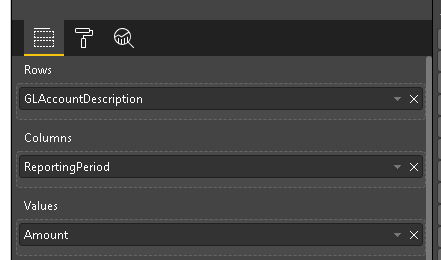
- Drag the field “GLAccountDescription“ to the Rows.
- Drag the field “ReportingPeriod” to the Columns.
- Drag the field “Amount” to the Values, as shown below:
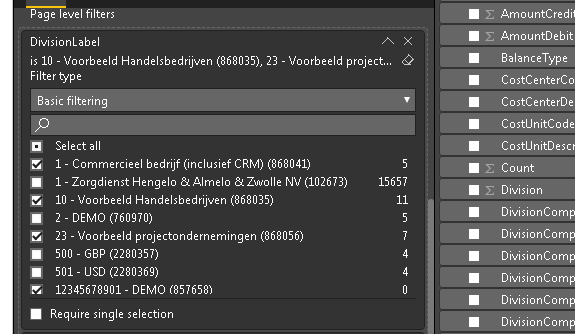
- Drag the field “DivisionLabel“ to the Page level filters.
- Select a number of Exact Online companies, such as:
- Drag the field “ReportingYear” to the Page level filters.
- Select a financial year, such as:
- After applying some trivial formatting, the consolidated balance across multiple companies appears:
- Congratulations, you have created your first report!


The sample uses 216 Exact Online companies, but since a balance is typical very short in number of lines that is not an issue. However, when you would report on millions of transactions in each company, Power BI would not be able to handle this volume easily. In those cases, resort to Invantive Data Replicator for high volumes or the bundled Invantive Data Cache which allows storage in an on-premise or cloud relational database such as SQL Server or PostgreSQL.
Licensing
The first 30 days of use are considered a trial. After the trial period has ended, the log on will fail. A license is available with a subscription on Invantive Office or Invantive Premium Finance. The key for the license should be stored on your PC to allow the connector to find the license. During the trial period, an integrated client ID is used. After the trial period, you should register your own client ID as described in the section on authentication using a refresh token.
The recommended steps to install a license key are:
- Place the text of the license key in a file named ‘invantive.lic’ in the folder %USERPROFILE%\invantive.
- Or set the environment variable INVANTIVE_LICENSE_FILE_PATH to the full path of the file.
- Restart Microsoft Power BI.
Alternatively, the file path of the license file can also be specified using the connection string key “license-file” of the Power BI data source as in:
license-file=h:\invantive\invantive-bridge-license.txt
Other driver-specific configuration options such as the client ID or number of parallel requests (requests-parallel-max) can be configured in the connection string too. The available options are listed with the data model of each Invantive SQL connector on https://documentation.invantive.com.